We’ve all heard the same tip at the shop—consistency matters—yet we’ve found that a simple coincidence can reveal a lot, like how a tiny leak suddenly shows up just as you finish a long project. We’ll walk you through practical, quick steps to keep your air compressor reliable, from daily checks to monthly and yearly tasks. Let’s start with what we can diagnose and fix now, so you don’t miss the clue that slows you later.
Key Takeaways
- Regularly inspect and replace worn hoses, fittings, and couplings to prevent leaks and pressure loss.
- Drain moisture from the tank at the lowest point until air is dribble-free; firmly close the valve afterwards.
- Check and top up oil as needed, run briefly to circulate, and schedule changes if oil appears dark or low.
- Clean or replace air filters, verify regulator settings, and schedule monthly and yearly checks for reliability.
- Calibrate or replace the pressure switch as needed, reseat wiring, and test the system to prevent improper cycling.
What a Well-Maintained Air Compressor Delivers
A well-maintained air compressor delivers consistent performance and fewer breakdowns. When we keep the unit in good shape, you notice fewer pressure swings and smoother operation, which lowers your tool downtime. A well maintained system meets its rated capacity, delivering reliable performance under load. We verify gauges, drains, and belts, ensuring no leaks siphon efficiency. Routine lubrication and clean filtration prevent overheating and particulate damage, extending component life. By tracking maintenance intervals, we catch wear early and schedule parts replacement before failure. We test start-up smoothness, check safety reliefs, and confirm proper venting. With disciplined upkeep, you gain predictable output, reduced maintenance surprises, and cost savings over time. In short, sound maintenance translates to dependable performance you can trust daily.
Daily Checks in Minutes for Reliable Operation
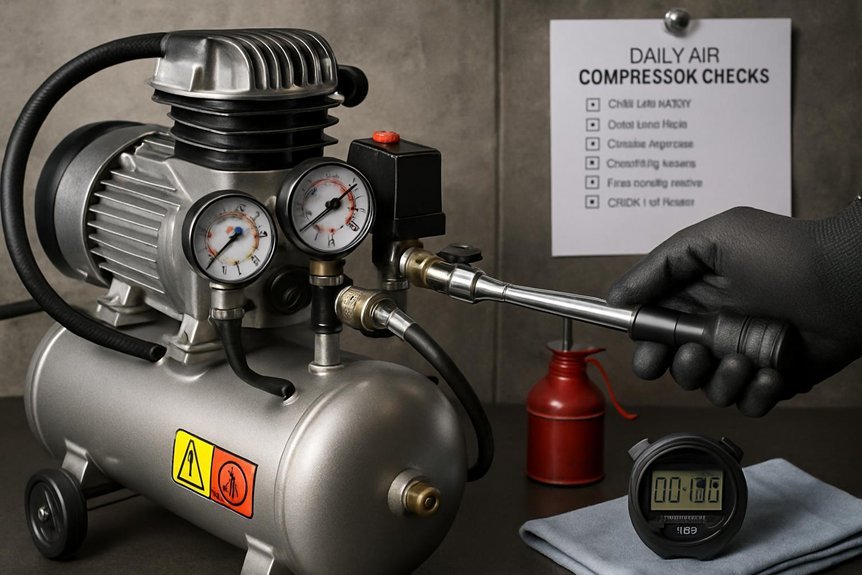
We’ll start our day with a quick, practical checklist that keeps your compressor reliable in minutes.
We perform concise, routine checks that prevent surprises and keep performance steady. Here’s our simple drift-free routine:
- Inspect hoses for cracks and tight fittings, focusing on drip free fittings
- Listen for unusual noises and apply noise reduction strategies
- Verify pressure gauges read within spec and adjust if needed
- Run a short cycle to confirm automatic cutoffs engage smoothly
Keep the area clean and dry, with minimal vibration. Record any deviations and resolve them before use. This brisk, repeatable sequence minimizes downtime and promotes consistent output, so you stay productive and safe. If issues persist, reassess setup and consider parts quality to sustain reliability.
Drain Moisture and Manage Oil to Boost Performance
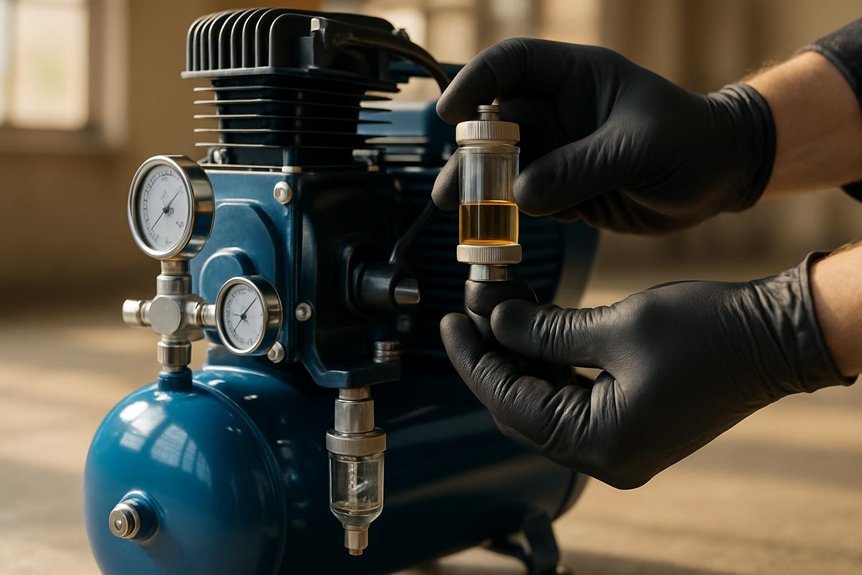
Drain moisture and manage oil to boost performance. We step through drains and gauges after every shift to keep air clean and cool. First, open the moisture drain at the lowest point of the tank and let condensation escape until steady, dribble-free air flows. Close the valve firmly. Next, check the oil sight glass or dipstick; if oil appears dark or low, schedule a change and top up with the manufacturer’s recommended oil. Run the compressor briefly to circulate fresh oil, then recheck levels. Use a purifier or inline filter as advised to minimize moisture ingress. Schedule regular oil changes and moisture checks in line with run hours. By staying proactive, you maintain efficiency and extend component life, reducing pressure drops and heat buildup.
Inspect Hoses and Air Lines for Wear
We inspect hoses for wear and check air lines safely so you don’t lose performance. We look for cracks, bulges, or leaks and replace any damaged sections immediately. If you spot issues, we seal or replace components and note the findings for future maintenance.
Inspect Hoses for Wear
Are hoses and air lines showing signs of wear? We approach inspection with a plan, then act. We look for cracking, fraying, kinks, or bulges along the hose material, and we check for stiffness that hints at internal damage. We test for leaks at fittings and along joints, listening and feeling for soft spots. We verify connector compatibility with your compressor and tools, ensuring clamps and swivels seat securely. If any issue appears, we replace the hose and any damaged fittings promptly.
- Check hose material for cracks, abrasions, and soft spots
- Inspect couplings, clamps, and quick connects for looseness or corrosion
- Test for leaks by pressurizing briefly and listening closely
- Confirm connector compatibility with existing tools and outlets
If replacements are needed, match specs to the compressor’s rating and tool requirements.
Check Air Lines Safely
If we’re checking air lines for wear, start by inspecting both hoses and fixed piping for signs of damage, stiffness, or leaks. Look for cracking, bulging, or softened spots that could fail under pressure. Check fittings and clamps for corrosion or looseness, tightening or replacing as needed. Trace lines from the compressor to the point of use, watching for abrasion where lines rub against metal edges or sharp corners. If you find moisture, oil, or contaminants in lines, drain or purge and replace affected sections. Test for leaks with a soap solution, repairing any found leaks promptly. Keep air lines clear of clutter to prevent kinks. Store and handle lines with welding safety in mind, and consider air conditioning system compatibility when troubleshooting.
Clean Filters to Improve Air Quality and Efficiency
Clean or replace the air filters to keep your compressor drawing in clean air and running efficiently. We’ll keep this simple and actionable, focusing on the effect on clean filters and air quality.
- Inspect filters for debris and wear, then clean or replace as needed
- Note any reduced airflow or pressure drop and address it promptly
- Use manufacturer-recommended filters and proper seals
- Schedule regular checks to sustain optimal air quality
Routine filtering reduces contaminants, lowers strain on the motor, and preserves downstream components. Clean filters prevent clogging, improve compressor response, and extend life. In practice, wipe or rinse removable housings, let filters dry fully, and reinstall securely. If you notice persistent contamination or performance loss, reassess filtration stage and replace worn parts to keep air quality high and efficiency steady.
A Practical Monthly and Yearly Maintenance Plan
A practical monthly and yearly maintenance plan keeps your compressor running smoothly and avoids unexpected downtime. We start with a simple monthly inspection checklist: check belts, drain condensate, verify pressure settings, and listen for unusual noises. We wipe surfaces, test safety valves, and confirm gauges read correctly. If anything seems off, we log it and address it promptly. For yearly calibration, we verify temperature, cut-off pressures, and regulator accuracy, adjusting as needed to manufacturer specs. We replace or clean filters as described in the manual, and inspect electrical connections for looseness or corrosion. Keep records of all tests, changes, and part replacements to track trends. By sticking to this cadence, we maintain performance, extend life, and minimize unplanned downtime.
Troubleshooting Common Air Compressor Problems and Quick Fixes
We’ll start with quick checks for common leaks, focusing on seals, hoses, and fittings, then show you how to apply simple fixes. If you hear hissing or notice a drop in pressure, we’ll walk you through identifying the cause from the tank to the lines and applying the right repair. Finally, we cover the pressure switch, tank drains, and drain-valves so you’re equipped to verify operation and stop wasteful loss.
Common Air Leaks Fixes
Have you found a drop in pressure or heard hissing from the lines? We’ll tackle common leaks with simple checks and quick fixes. First, identify the leak source by listening and tracing damp spots along hoses and fittings. Next, tighten connections and swap worn gaskets where needed. If a hose shows cracks, replace it with a proven hose fix that matches your model. Finally, inspect valves and seals for wear and replace as required. Keep gaps minimal and test after each step.
- Tighten fittings and replace worn gaskets
- Inspect hoses for cracks and swap with proper hose fixes
- Check valve seats for wear and replace as needed
- Pressurize and listen for remaining hiss to confirm seal integrity
Pressure Switch Troubleshooting
When a compressor won’t start or stops early, the pressure switch is a common culprit. We begin by inspecting the switch housing for obvious damage and ensuring the cords aren’t frayed. Next, we test the electrical connections, tightening terminals and reseating wires as needed. If the unit won’t reach cut-in pressure, we perform a pressure switch calibration following the manufacturer’s spec; small adjustments can fix mis-timed cycling. If calibration fails to restore operation, we consider pressure switch replacement and verify compatibility with your model. After any adjustment or replacement, test the system by cycling power and observing pressure buildup to the cut-out point. Note that improper calibration or incompatible replacement parts can worsen performance, so consult the spec sheet and use OEM components when possible.
Tank Drain and Drain-Valves
Tank drains and drain valves are your first line of defense against moisture buildup, so we’ll start by checking for leaks and proper drainage. We use a quick, systematic approach to verify that the tank drain and drain valves seal properly and vent correctly, then test with a light air dump to confirm drainage flow. If we hear hissing or see drips after closing, we tighten connections and replace worn packing.
- Inspect the drain valve for corrosion or gunk and clean during service
- Open and close the valve fully to ensure smooth operation
- Verify the tank drain releases moisture at the low point
- Replace faulty gaskets or valves to prevent leaks
Frequently Asked Questions
How Often Should I Replace the Air Filter Beyond Monthly Maintenance?
We should replace the air filter every 6 months as part of our maintenance scheduling, unless performance drops or we see excessive oil contamination; in that case, do it sooner. Two word discussion ideas: timing clarity.
What Safety PPE Is Needed During Ongoing Maintenance?
Safety PPE is essential during ongoing maintenance; we’ll wear eye protection, gloves, hearing protection, and a hard hat as needed. Like a shield, we proceed methodically, following steps, documenting filters, pressures, and lockout/tagout procedures for safety.
Can I Use Water-Based Cleaners on the Compressor Body?
Yes, we can use water based cleaners on the compressor body, but we must apply them carefully. Rinse, dry thoroughly, and avoid electrical components. We’ll prioritize water based cleaners for compressor body care, and inspect seals afterward.
How Do I Recognize Bearing Wear Before Failure?
Bearing wear signs include vibration, odd noises, and heat; we detect early with consistent checks, listening closely, measuring play, and inspecting housings. We alert, lubricate, and replace parts promptly, aiming for early detection, proactive maintenance, and reliability.
Is There a Recommended Maintenance Schedule for Portable Compressors?
We recommend a simple schedule: daily quick checks, weekly lubrication and filter changes, monthly belt and hose inspection, and quarterly vibration monitoring readings, logging results. For portable units, prioritize portable lubrication access and routine dust and debris removal.
Conclusion
We’ve all seen how a tiny drip becomes a flood when ignored. Think of our compressor like a patient engine: daily checks, clean filters, and timely drains keep it humming. In one plant, a simple monthly belt inspection cut downtime by 30% after a misalignment was caught early. Treat it like a routine heartbeat—drain, oil, inspect, repeat. Stay proactive, follow the plan, and your air stays clean, reliable, and ready.

