We’ll keep our DIY air compressors reliable with a practical, methodical approach: check oil levels, drain condensate daily, and inspect filters for fouling; listen for leaks in hoses and fittings at operating pressure; set a steady cadence for belts, hoses, and moisture draining. We’ll keep a labeled storage system and a simple maintenance log. If unusual noises or persistent issues show up, we’ll know when to seek professional help—and that awareness starts here.
Key Takeaways
- Establish a regular maintenance cadence covering weekly, biweekly, and monthly tasks to sustain performance and reliability.
- Check oil level, drain condensate daily or after use, and replace dirty air filters to protect tools.
- Inspect hoses, fittings, clamps, and leaks; tighten or reseal as needed to prevent pressure loss.
- Monitor pressure switch, regulator, and power supply to troubleshoot slow startups or pressure sag quickly.
- Maintain organized records and use quick-fix protocols for common symptoms to minimize downtime.
What Your DIY Air Compressor Should Do (Core Functions)
A DIY air compressor should reliably deliver the right amount of air where you need it, when you need it, with consistent pressure. We’re outlining core functions so you know what to expect in everyday use. First, it should supply steady airflow to power tools or inflate gear, maintaining PSI within a usable range. Next, it should monitor and regulate pressure, stopping and starting to prevent surges. It must heat-correct airflow, filtering particles to avoid tool damage and premature wear. It should also provide audible or visual feedback when limits are reached, so you can act promptly. Finally, it should operate with efficiency, minimizing energy waste, and offer quiet operation to support longer sessions. These goals support compressor efficiency and noise reduction for reliable, practical performance.
Safety First: Prep and Protective Gear
We start with the basics: we’ll cover safety gear essentials, prep before use, and protective equipment checks to keep you protected. We’ll walk through quick, practical steps so you know what to have on hand, how to prepare the space, and how to verify gear is ready every time. If anything feels off, we’ll stop, reassess, and tighten checks before powering up.
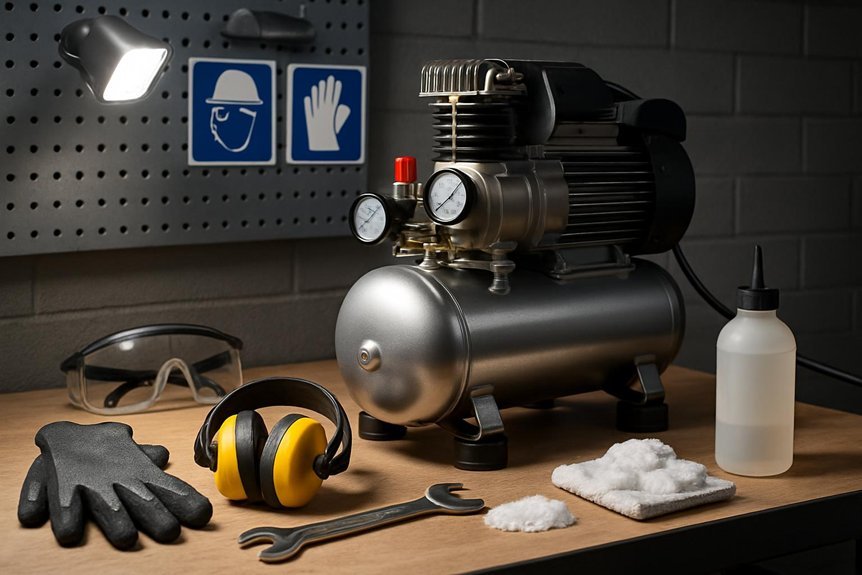
Safety Gear Essentials
Safety gear isn’t optional when maintaining an air compressor—we gear up first to prevent injuries and equipment damage. We’ll cover essential PPE and why it matters, then get straight to the point so you can work confidently.
| Item | Purpose |
|---|---|
| Safety gloves | Protect hands from sharp fittings and hot surfaces |
| Hearing protection | Minimize noise exposure during operation |
| Eye protection | Shield eyes from debris and oil spray |
| Respiratory mask | Filter dust and fumes in dusty environments |
We choose fit, comfort, and effectiveness. We inspect gear before use and replace worn parts. We keep gloves clean and dry, and we store protection within easy reach. If you’re unsure about fit or rating, ask before proceeding. With the right safety gear, we reduce risk and stay focused on the task at hand.
Prep Before Use
Before using the air compressor, we perform a quick safety check and prep the workspace: confirm power sources, inspect hoses and fittings for damage, and clear the area of clutter or trip hazards. We then confirm control settings are correct and attach cords or hoses securely. Next, we plan our task with a clear sequence and estimated duration to guide maintenance scheduling, minimizing surprises. We verify that gauges read within normal ranges and listen for unusual sounds during a brief test run. We store tools and manuals nearby, noting any recalls or service notices. After use, we document any wear or needed service in a simple log. We follow storage best practices to prevent corrosion, corrosion, or leaks, ensuring readiness for the next session.
Protective Equipment Checks
We’ll start by equipping ourselves properly, building on the prep work from the previous step. We assess protective equipment before any work, checking fit, condition, and availability. We confirm a well-fitting helmet, safety glasses, hearing protection, gloves, and steel-toed boots are present and undamaged. We verify PPE compatibility with the tools we’ll use, ensuring plugs, hoses, and guard shields don’t interfere with protective gear. We inspect respirators or dust masks if required, replacing cartridges as needed. We establish a clear workspace with accessible first aid and a fire extinguisher. We document any PPE defects and replace faulty items promptly. With all equipment in order, we proceed confidently, maintaining a safety-first mindset throughout maintenance tasks. This disciplined check minimizes risk and supports efficient work.
Check Oil, Drain Condensate, and Filter Quality
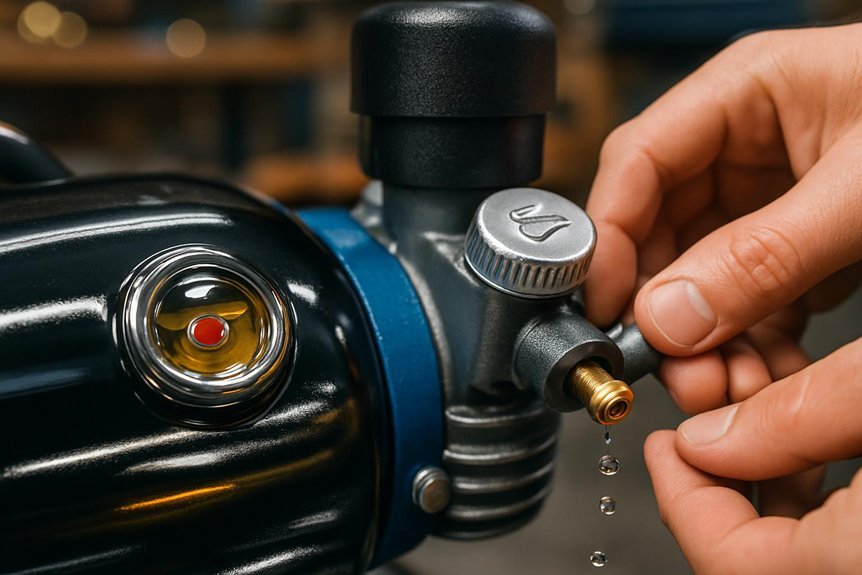
To keep your compressor running reliably, we’ll start with checking oil, draining condensate, and inspecting the filter. We monitor oil capacity and level, topping only to the recommended mark, then note lubricating intervals to align maintenance with usage. Next, we drain condensate on a schedule that matches your environment, ensuring water and contaminants don’t accumulate. We inspect the filter for fouling or damage and replace it when needed; filter replacement frequency depends on duty and air quality. We assess airflow performance and confirm the intake and outlet paths aren’t restricting flow. Finally, we verify the pressure switch calibration so cut-in and cut-out stay accurate. Routine checks like these keep performance steady and extend component life.
Inspect Hoses and Fittings for Leaks
We’ll start by checking all hose connections for snug, clean fits and any obvious signs of wear. Next, we listen for any hissing or air leaks as we operate the system at typical pressure. Finally, we inspect fittings for tightness and replace or reseal any that feel loose or show damage.
Check Hose Connections
We start by checking every hose and fitting for signs of wear, cracks, or leaks, because a small flaw can cascade into a bigger problem. We approach hose connections with methodical checks: confirm tightness by hand, then snug with a wrench without overtightening. Inspect quick-connects for corrosion or misalignment, and replace gaskets if needed. Trace hoses along their entire length, looking for kinks, fraying, or soft spots that signal age or damage. Document maintenance routines and note any recurring weak points to inform future discussion ideas. When a leak isn’t obvious, perform a controlled pressurization test at low settings to locate slow drips. Keep spares on hand, labeled and organized, to minimize downtime and preserve safe operation of the system.
Listen For Leaks
With hose and fitting checks done, we turn our ears to any signs of leaks. We listen for hissing or a steady whoosh that doesn’t match the system’s normal rhythm. Our approach centers on leak identification: we trace suspect sections during operation, then pause to recheck with the compressor running at a steady, known level. We move methodically, listening near joints, fittings, and quick-connects, noting any change in tone or intensity. Sound localization helps us pinpoint exact sources, so we don’t chase phantom leaks. If a leak is found, we verify by slight pressure reduction and re-listen before loosening or tightening. We document findings briefly for maintenance logs, then proceed to corrective steps, keeping safety and system performance in focus.
Inspect Fittings Tightness
First, we’ll check all hose and fitting connections for looseness, listening for any new or changing leaks as the system runs. We’ll perform a tightness assessment by inspecting terminations, gaskets, and clamps, noting any changes in sound or rate of leak. We’ll verify connector compatibility across brand and size, ensuring threads and adapters match without cross-threading. If anything seems off, we’ll tighten gradually and re-test.
- Inspect all clamps and ferrules for corrosion or looseness
- Check hose ends for cracks, wear, or bulges
- Confirm threaded fittings thread smoothly without stripping
- Re-test under operating pressure to catch intermittent leaks
Drain Condensation: Frequency and Amount
How often should you drain condensation, and how much should you remove? We start with a simple rule: drain condensation after each use and at the end of the day when practical. In portable and small-shop tanks, a short, controlled vent helps, just enough to release clear steam or a light moisture ring around the drain. For larger receivers, open the drain fully until water stops, then close. We’re mindful of the drainage interval, not overdoing it, to avoid depressurizing loops. Use a calibrated approach: note how much moisture escapes over a set period and adjust frequency guidelines accordingly. Record routine checks, keep the drain clear, and maintain a steady, measurable cadence for reliable performance.
Basic Troubleshooting: Common Symptoms and Fixes
Ever wonder why your air compressor acts up? We’ve seen the same patterns, and we’ll walk you through practical fixes without delays. First, identify symptoms quickly, then apply targeted solutions. We focus on dust mitigation and noise reduction to keep performance steady.
Ever wonder why your air compressor acts up? We’ll walk you through quick fixes, focusing on dust, noise, and steady performance.
1) If it’s short cycling, check the pressure switch and air filters, clean or replace as needed.
2) If you hear rattling or grinding, shut down and inspect the belt, pulleys, and mounts for looseness or wear.
3) If pressure sags under load, verify intake leaks, tighten fittings, and test the regulator for proper adjustment.
4) If it won’t start, confirm power, reset switches, and inspect motor capacitors for signs of failure.
Create a Simple Maintenance Schedule That Sticks
We’ll start with a practical, no-nonsense maintenance routine you can actually stick to. We outline a simple maintenance schedule that fits real life, then lock in a repeatable workflow optimization. By pairing tasks with frequencies, we minimize guesswork and maximize reliability. We assign clear owners, due dates, and checkboxes so nothing slips. Here’s a quick visual:
| Task | Frequency |
|---|---|
| Inspect belts, hoses, and fittings | Weekly |
| Drain moisture, test pressure switch | Biweekly |
| Clean filters, lubricate moving parts | Monthly |
This approach keeps tasks actionable, reduces downtime, and supports consistent performance. Commit to the schedule, track completion, and adjust as needed. If the workload shifts, refine tasks or frequencies to maintain steady workflow optimization and reliability.
Storage and Long-Term Care for Hobby Setups
Storing and caring for a hobby setup long-term means planning now to prevent damage, corrosion, and clutter later. We’ll cover practical steps that keep equipment ready and safe, without wasting space or energy. By focusing on efficiency, we guard against degradation while simplifying future use.
1) Prepare a dedicated, labeled storage area with climate control and airflow to reduce moisture-related issues.
2) Implement storage optimization by stacking components safely, using labeled bins, and cataloging parts for quick reassembly.
3) Consider battery alternatives for power backups, like rechargeable packs, to minimize corrosion risk and disposal concerns.
4) Create a maintenance log that tracks cleaners, lubricants, and shelf life, plus seasonal checks to prevent surprises.
When to Seek Professional Help Without Regret
When in doubt, seek professional help before a problem compounds. We’ll outline clear triggers to avoid regret and downtime. If you notice persistent unusual noises, failing safety valves, or inconsistent pressure, consult a pro. Recurrent leaks, overheating, or oil or coolant contamination signal deeper faults that DIY may not safely resolve. If your maintenance budget is tight, still prioritize safety budgeting by allocating funds for inspections and parts rather than risky improvisation. Tool ergonomics matter too: awkward handles, awkward reach, or excessive vibrations can hide misalignment that a tech should address. We’ll aim for timely guidance, not procrastination.
| Warning signs | Next step |
|---|---|
| Noise/ vibration | Schedule inspection |
| Low/ fluctuating pressure | Diagnostic check |
| Leaks | Repair or replace seals |
Frequently Asked Questions
How Often Should I Replace the Air Compressor Oil?
We replace the oil every 6 months or 100–200 hours, whichever comes first. We monitor oil color and level, use compatible oil types, and document changes. Oil change frequency depends on usage, oil type compatibility, and operating conditions.
Can I Run a DIY Compressor Without an Oil Reservoir?
Yes, we can; we’d never juggle danger like clowns with fire. An oil-free system can work, but it won’t be silent forever. We’ll prioritize oil free systems, silent operation, and practical, methodical maintenance.
What’s the Ideal Humidity Level for Storage Locations?
We aim for about 40; you’ll want humidity control at roughly 40–60% RH, depending on content. For packaging storage, keep consistently cool and dry, monitor weekly, and seal containers to prevent moisture ingress.
How Do I Identify a Failing Pressure Switch?
Heads up: we can identify a failing pressure switch by listening for erratic cycling and checking electrical indicators. We’ll troubleshoot electrical indicators, test with a multimeter, and confirm proper cut-in/cut-out pressures before replacing components.
Are There Noise-Reduction Techniques for Loud Units?
Yes—try noise diagnostics first, then address mounting, enclosure, and vibration. We’ll seal gaps to improve electrical insulation, install a soft-start or isolation pad, and route cords away from heat sources for quieter operation and safer performance.
Conclusion
We want to keep our compressor humming like a trusty steed in a well-worn barn. Imagine each maintenance task as a routine feeding: oil checked, condensate drained, filters refreshed, hoses inspected. When we stick to the cadence, problems stay away, and air stays clean. If you hear a hiss or see leaks, we don’t panic—we track, tighten, and troubleshoot. Together, we maintain reliability, safety, and efficiency—one simple, steady habit at a time.

